Pixie HeartStrings was inspired by all the little Pixies who are being raised by other family members when their parents are unable to do so...

Saturday, May 25, 2013

A Great Week...


Hi Pixie Pals!
What a great week this has been! It has been very productive for me...
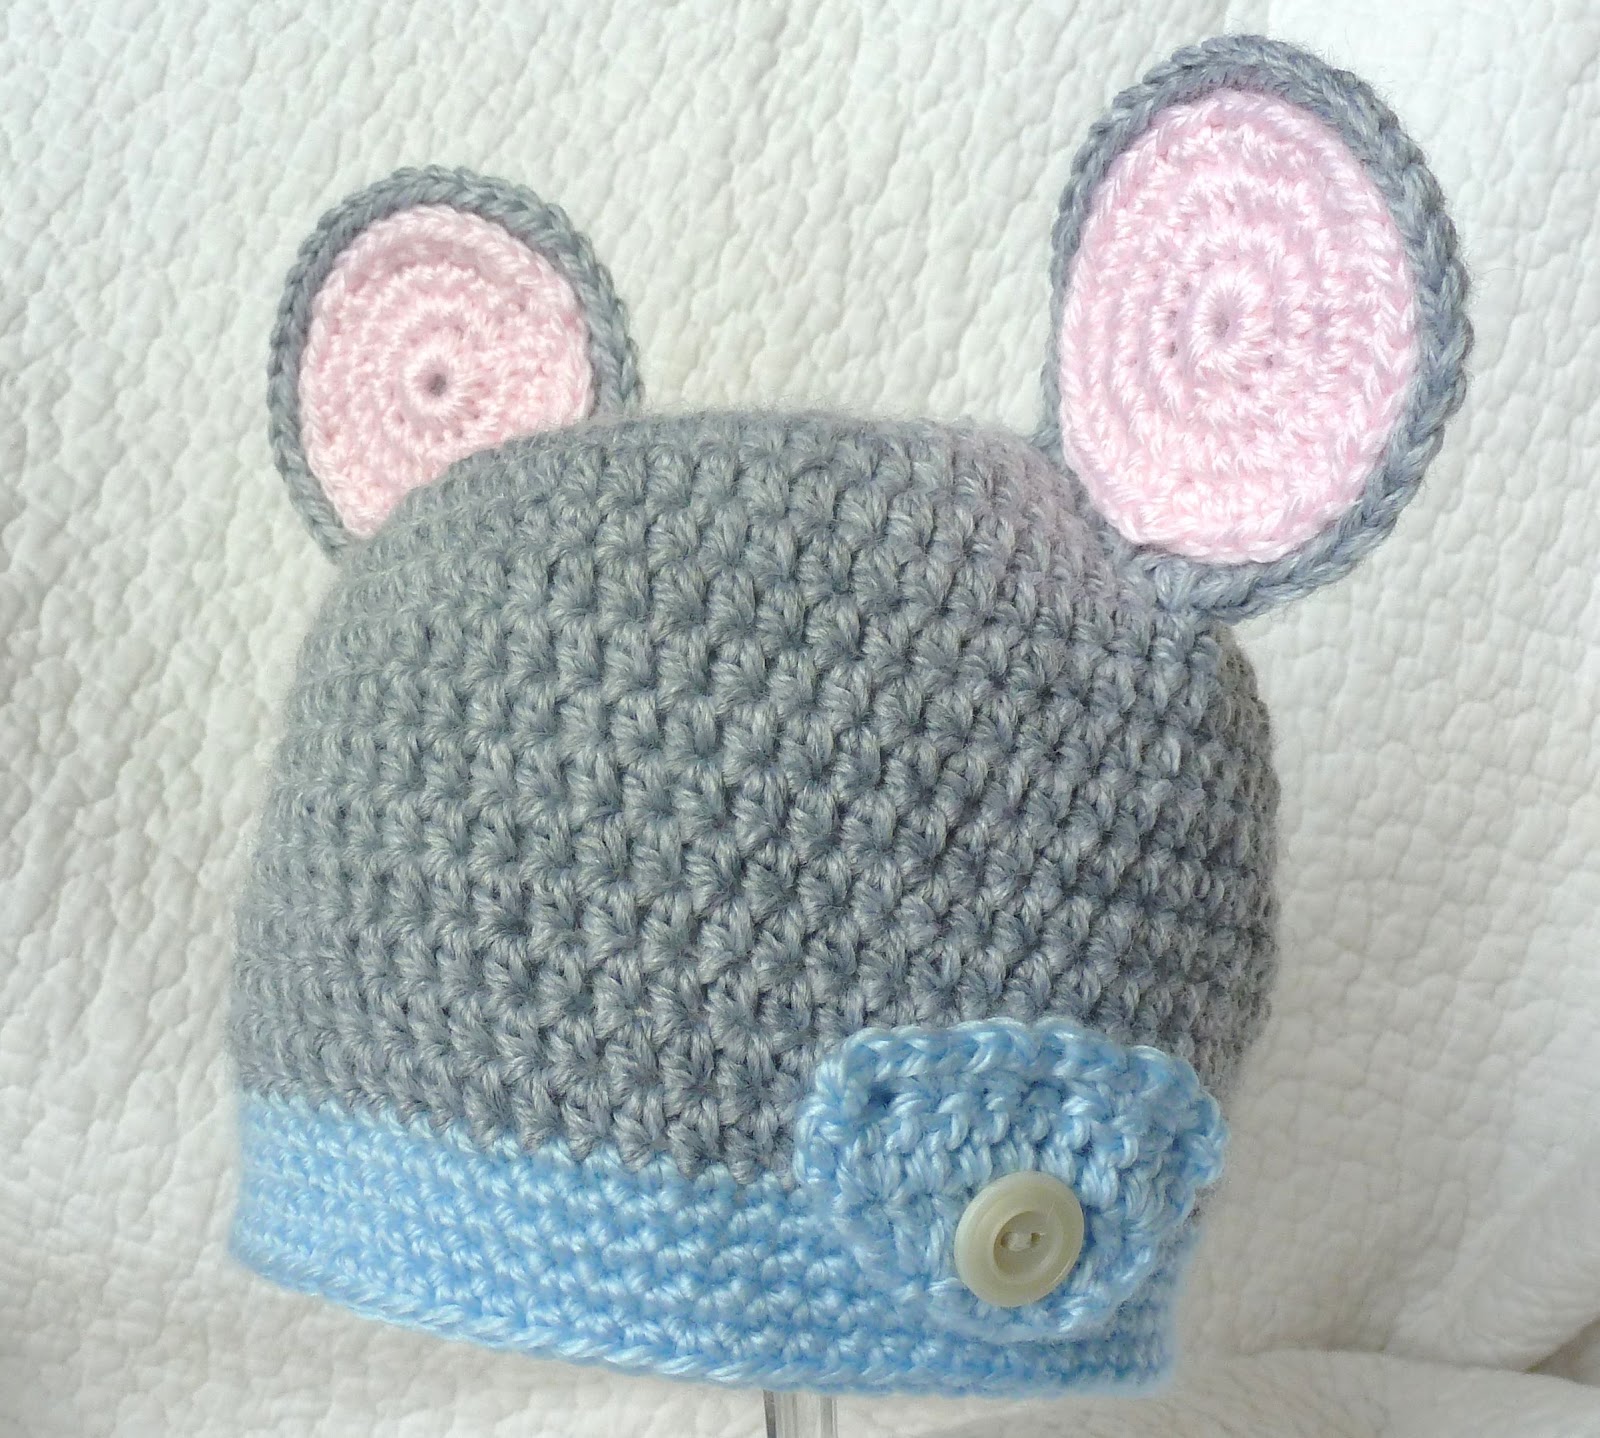
I heard of a newborn baby boy who will be going to live with his Gramma. My heart went out to her. It is not easy to take on a newborn later in life. I pray she will have the support of others to help her. But I also know that he will bring her great joy...
To welcome him into his new, loving home I sent over this little hat & diaper cover set. Simple & Sweet.


I love the over-sized button on the front of the diaper cover. I used snaps to actually close it... 

I made this cute Crown & Diaper cover for my Etsy Shop! So adorable and I think they would make for the cutest photos ever! The pattern for the Crown came from here. The diaper cover is just a simple pattern I have been making for many years...

Crown & Diaper Cover Set
http://www.redheart.com/free-patterns/little-prince-hat

Diaper Cover with Crown Applique
I have a dear friend who is raising her beautiful granddaughter. The little Pixie just turned 4 years old recently. She is so sweet. 
Sadly, her Mom could not find her way out of her depression and addictions and took her own life, forever altering the lives of those who loved her most. My heart breaks for them. 
I made this little dress for her to take on her vacation that is coming up soon. Just a little something she can slip on when she goes out for the day or to dinner with her "Gwammy". I added all the flowers to the bodice because she loves to help her Gwammy in the garden. So precious...


Floral Bodice...

I hope this brings a smile to this sweet little girl! May she only know love & happiness for the rest of her life...

I also made this sailor hat for the shop. I LOVE a sailor hat on babies! My youngest son had golden curls & chubby cheeks when he was a baby. When he wore his sailor hat the curls would pop out from the bottom and he looked like an angel. Making this hat reminded me of those early years. So long ago, but still a wonderful memory...


So this has been a great week! I feel like I really accomplished a few things...
I hope that your week has been great too!  
Be sure to visit me on my Pixie HeartStrings Facebook page and let me know what is on the other end of your hook! 

XOXOX,
Susie

P.S.
Today, was my birthday. I had a nice quiet day at home with my dear hubby and my not so little anymore Pixie. We had a late brunch and then celebrated with this pretty cake they got for me...

I am grateful they didn't risk a fire hazard and kept the candles to only four...
Like I said, It was a great week!

Tuesday, May 21, 2013

Winner!


Good Morning Pixie Pals!

Well, WE HAVE A WINNER!

It was a small group and I wish I could give you each a hat! I really do!

As you can see, I wrote all the names on a piece of paper... 


Then I added them to my favorite milk glass bowl for luck!


And the winner was drawn! Drum roll please.............


Congratulations Jean Sain (Little Red)!

Jean chose one of my "City Mice" hats as her prize! I love these hats!!!


Would you like the girl mouse?

I love the rhinestone flower button accent...
Or would you prefer the very dapper boy mouse?
Jean Sain, if you would email (pixieheartstrings@gmail.com) me your mailing address I will send your choice of hat right out!
Thank you so much to you all for helping me reach my first goal on my Pixie HeartStrings Facebook page! My next goal is 500! How awesome will that be to have 500 people/pages who can help get the word out about Pixie HeartStrings and my mission to provide hats and other items to Pixies who have been displaced from their homes and are in need of a smile!
And make sure to check out my Etsy Shop for new & exciting items! The items I sell here help make it possible for me to be able to give to those sweet Pixies and to donate to other great causes as well...
I hope you all have a fabulous, creative Tuesday!
XOXO,
Susie


Sunday, May 19, 2013

Confetti & Giraffes...


Hi Pixie Pals!

We had an overnight visit from the Grands last night! Always the best way to spend a Saturday night. Movies, laughter & junk food... ;)
This morning I made them confetti pancakes...a fun way to start off the day!

 
Then my 12 year old Grandy Girl showed me a picture on her phone of a hat she liked and asked me if I knew how to make it. It was the cutest giraffe hat! How could I say "no"?
Picture from her phone. I did not capture the source. Apologies if this cutie is yours!

Luckily, I had the perfect shade of cotton and I gave it a shot. After a couple of hours this is what I came up with...
 

Not too bad without a pattern to go by. And I love how big a smile it gave her...


I was asked on my Pixie HeartStrings FaceBook page for the pattern...I didn't have one, but I can try to explain how I made the ears & antlers. The hat is a basic double crochet beanie that I added a little contrasting color stripe to...
 
Ears:
G Hook
Country Yellow Cotton Yarn (I used Sugar & Cream)
  1. Chain 10. SC in 2nd chain from hook and across. 8 SC.
  2. 2 SC in 1st stitch. SC across to last. 2 SC in last stitch. 10 SC.
  3. SC across.
  4. Repeat row 2. 12 SC
  5. Repeat row 3.
  6. Repeat row 2. 14 SC
  7. Repeat row 3.
  8. Repeat row 2. 16 SC
  9. Repeat row 3.
  10. Skip 1st SC. SC across. Do not SC in last stitch. 14 SC
  11. Skip 1st SC. SC across. Do not SC in last stitch. 12 SC
  12. Continue decreasing this way til there are only 2 stitches left.
  13. SC down left side of ear. When you reach the bottom row (starting chain), SS into every other stitch tightly across. This gives the ear that cupped shape. Then SC up right side of ear. Fasten off.
  14. With contrasting color (I used brown cotton), starting at bottom right, SS in each SC up the right side of ear. When you reach the last row at the tip of the ear CH 3 and then SS in each SC down left side of ear. This forms a nice tip to the top of the ear. Fasten off.
  15. Make second ear exactly the same. Attach to side of hat.
  16. Back of Hat
    Antlers:
     
    G Hook
    Brown Cotton Yarn
    Country Yellow Cotton Yarn
  1. With Brown. Chain 2. Six SC in 1st chain. Do not connect with SS.
  2. 2 SC in each SC. 12 SC
  3. 2 SC in each SC. 24 SC
  4. SC in each SC. 24 SC.
  5. *SC 2 SC together. SC 1.* around.
  6. Attach Yellow. SC around each stitch for 5 rows. Fasten off leaving long tail to sew onto hat.
  7. Stuff the antler with fiberfill or cotton firmly.
  8. Attach to top of hat.
Hair:
Optional
With Brown Cotton make a tassel and attached to top of hat between antlers. Trim to desired length.
Hair...

This was so much fun to make & it made my Grandy Girl smile...that is worth everything in the world to me!
 
As always, if you have any questions, let me know. Always happy to help!
 
Have a great Sunday night!
 
Blessings,
Susie

Friday, May 17, 2013

Sea Glass Inspiration...


Hi Pixie Pals!
 
Thank you, thank you, thank you for all the sweet comments on my Pixie HeartStrings FaceBook page! It means so much to be complimented by such wonderfully talented women! Seriously...there are some awesome crochet artists & crafters out there!
 
I was asked to share the pattern for my Sea Glass Inspired Baby Blanket. So I thought..."I don't even know what it is called. Sure. Why not?"...ha ha! So here you go...
 
 
Sea Glass Inspired Baby Blanket
 
Materials:
 
Worsted Weight Yarn (size you choose to make will determine how much you need).
Main Color (MC) you will need at least twice as much of this.
Contrasting Color (CC)
J Hook
 
Directions:
  1. Decide how wide you want your blanket to be. Make a base chain with your MC. End with an uneven # of chains.
  2. SC in 2nd chain from hook and in each chain across. Fasten off. This is your Right Side (RS). 
  3. With RS facing you and with CC, *SC in 1st SC, chain 1, skip next SC, SC in next SC* across ending with a SC in last SC. DO NOT FASTEN OFF.
  4. With RS facing you and with MC, attach MC with a SS and chain 3 in 1st SC. In chain 1 space make a cluster with 3 DC (YO, insert hook in ch 1 space, [pull up a loop and pull through 2 loops on hook] 3 times, YO and pull through all 4 loops on hook. Cluster made. *Chain 1, skip next SC, make cluster in next ch 1 space* across. End with DC in last SC on row. DO NOT FASTEN OFF.
  5. Picking up CC loop from previous row pull through loop on hook. Drop MC. With CC work SC in top of 1st DC, CH1, *now working in between next 2 clusters on previous row, SC, CH 1* across to end. SC in top of chain 3 from previous row. DO NOT FASTEN OFF.
  6. Go back to beginning of this row &Pick up MC and make chain 3 in 1st SC, work clusters in each chain 1 space across. DO NOT FASTEN OFF.
  7. Work rows 5 & 6 in pattern until you have reached desired length. End with a row of SC in MC with RS facing you.
As I do not know what this is called, only how to do it (thanks to my Great Grandmother), I have no formal pattern. But it is really simple & if you do run into any issues let me know & I will be happy to help.
One other thing. You can get creative with this by changing contrasting colors and making a pattern. Rainbow effects are nice. Bright, bright colors with a black MC are very striking.
Anyway, it's yours now. Be creative. Make it your own. Have fun. AND Share!
 
Have a wonderful weekend Pals...
XOXOX,
Susie


Wednesday, May 15, 2013

Popcorn Sun Hat Pattern...


Hi Pixie Pals!

Wow! Today my Pixie HeartStrings Facebook page reached and exceeded 100 LIKES!

And, as promised, I am having a GIVEAWAY for one lucky Pixie Pal to receive a Pixie Hat of their choosing from my Etsy shop. If you haven't entered, make sure you do...

But, I feel bad that only one hat will be given out. So, I decided to share this new pattern I made today for a Pixie Hat that you can make yourself! No waiting!!!

You can make & sell or give as gifts of love or charity to your hearts content! As the hat is made from 100% cotton, it is cool & comfortable to be worn in the sun. The wider brim will help provide a child's head & face with protection from damaging suns rays.
And, cotton is preferred for chemo caps this time of year. This would make an excellent chemo cap as it is tight stitched to provide total head coverage for chemo patients. Consider making an extra or two and donating them. My preferred chapter is The Sadie Sunshine Chapter. A wonderful group doing wonderful things for chemo patients young & old. And they are so grateful & gracious even in their own personal loss.
Thank you all from the bottom of my heart for helping me reach my goal of 100 likes. This excites me because there are at least 100 more people who I can reach with the message of giving. Be it to a child (Pixie) in need or someone who is going through chemo.
There are also many other organizations out there who are looking for people like you & me to share our talents and provide someone with a handmade item. A simple hat, blanket, tote bag. Something to let them know there are people who care.

Popcorn Sun Hat

Popcorn Sun Hat Pattern
 
Materials:
 
Worsted Weight 100% Cotton Yarn
Size G Crochet Hook
 
Directions:
  1. Chain 4 and join with slip stitch to first chain to make a circle.
  2. Chain 2. (does not count as first stitch now or for rest of hat) make 12 DBL crochet in circle. Join with slip stitch to 1st DBL crochet. 12 DBL crochet.
  3. Chain 2. Make 2 DBL crochet in each stitch around. 24 DBL crochet.
  4. Chain 2. *DBL crochet in 1st stitch. 2 DBL crochet in next stitch* around. Join with slip stitch to 1st DBL crochet. 36 DBL crochet.
  5. Chain 2. *DBL crochet in first 2 stitches. 2 DBL crochet in next stitch* around. Join with a slip stitch to 1st DBL crochet. 48 DBL crochet.
  6. Chain 2. *DBL crochet in first 3 stitches. 2 DBL crochet in next stitch* around. Join with a slip stitch to 1st DBL crochet. 60DBL Crochet. Top of hat is done.
  7. Chain 1. Single crochet in same stitch and each stitch around. Join with Slip stitch to 1st SC. 60 SC
  8. Repeat row 7. 60 SC
  9. Chain 1. Turn piece so you are now working with inside of hat facing you. *SC in same stitch. Triple crochet in next stitch* around. Join with a slip stitch. 60 stitches.
  10. Chain 1. Turn piece again so you are working on outside of hat. SC in each stitch around. 60 SC
  11. Repeat row 7.
  12. Repeat row 7.
  13. Repeat row 9.
  14. Repeat row 10.
  15. Repeat row 7.
  16. Repeat row 7.
  17. Repeat row 9.
  18. Repeat row 10.
  19. Repeat row 7.
  20. Repeat row 7. Sides of hat are done.
Brim:
  1. Chain 1. *SC in 1st 5 stitches. 2 DBL crochet in next SC* around. Join with a slip stitch to 1st SC. 70 SC.
  2. Chain 1. SC in each stitch around. Join with a slip stitch to 1st SC. 70 SC.
  3. Chain 1. SC in 1st 3 stitches. *2 SC in next stitch. SC in next 6 stitches* continue from * to * til last 3 stitches. SC in last 3 stitches. Join with a slip stitch to 1st SC. 80 SC.
  4. Chain 1. SC in each stitch around. Join with a slip stitch to 1st SC. 80 SC.
  5. Chain 1. *SC in 1st 7 SC. 2 SC in next stitch* around. Join with a slip stitch to 1st SC. 90 SC.
  6. Chain 1. SC in each stitch around. Join with a slip stitch to 1st SC. 90SC.
  7. Chain 1. SC in 1st 4 stitches. *2 SC in next stitch. SC in next 8 stitches* til last 4 stitches. SC in last 4 stitches. Join with a slip stitch to 1st SC. 100 SC.
  8. Chain 1. SC in each stitch around. Join with a slip stitch to 1st SC. 100 SC.
  9. Slip Stitch in each stitch around. Join and fasten off. Weave in end.
If you make a Popcorn Sun Hat from my pattern feel free to post a picture on my Facebook page. I would love to see it!


Top of Hat


Close Up of Popcorn

Thank you again for helping me reach my first milestone...
Next one will be 500 LIKES so make sure to tell all your friends about Pixie HeartStrings!

XOXOX,
Susie

Giveaway!


Hi Pixie Pals!

Exciting News! Pixie HeartStrings has reached it's first 100 LIKES on Facebook! So that means I will be giving away a Pixie Hat to 1 Sweet Pixie Pal!

All you have to do is:
  1. Go to my Etsy Shop pixieheartstrings & browse the current inventory of HATS (this GIVEAWAY is for a hat only).
  2. Choose which hat you would like.
  3. Leave a comment here stating which hat you would like.
  4. Wait until 8AM on 5/21/2013 to see if YOU are the lucky winner.
That's it! That's all you have to do! Easy as 1,2,3! Err...1,2,3,4. Simple.

A couple of things to remember...
Special orders don't upset me. If you would like the hat you choose in a different color/size than I have listed in Etsy, I will do everything possible to make it the way you want.
You can comment up until 11:59PM EST on 5/20/2013.
You don't have to like my Facebook page to become the winner of this giveaway. But I hope you do decide to join in on the fun.

Thank you all for your support here and on Facebook. You have no idea how much fun I am having and how much it means to me that you have all decided to come along for the ride with me!

GOOD LUCK!

XOXOXOXOX,
Susie

Tuesday, April 16, 2013

4/15/2013


"There ARE bad people in the world...".

 That is the start of a conversation I have had to have with my sweet Pixie more times than I want to remember...

"...But there are so many more GOOD people. And the power of love WILL get us through."

We must hold each other tight and love with all our might...

It is the only way to stamp out evil...

My heart & prayers go out to each and every person affected by the evil and cowardly acts of terrorism during yesterday's Boston Marathon...

I am grateful that as a resident of Massachusetts with many friends and relatives who were there at the finish line that they all came through with only minor injuries...

However, I know they are forever going to be emotionally scarred by the horrors they witnessed and experienced...

All I can do is LOVE them with all my heart...

And I do...

Blessed,
Susie

Sunday, April 14, 2013

New in Shop & Laughing Til it Hurts...

Hey Pixie Pals!

It has been a great week! Lots of Pixie Hats went out the door! Always feels great to make something for those sweet little Pixies! I wish I could do so much more!!!

I am excited about adding children's clothing to my Etsy Shop! I am starting to add summer clothing and hope to eventually have some coordinated sets to go with my Pixie HeartStrings Hats & Shoes. The sewing machine has been humming. I just have to photograph some of my finished products and will be adding them in this week. I do have this set here in there now as a little sneak preview...


All of my items are made by me from cotton/cotton blend fabrics that I launder and dry to reduce shrinkage. I make only French seams throughout so there are no exposed raw edges anywhere inside the garments. Double stitched inseams for extra strength.

I loved sewing for my children when they were, well...children. In fact, my daughter reminded me of some of my more infamous fabric choices (affordable=gaudy) when she was small...we laughed so loud reminiscing. I love to laugh with her. She laughs with her whole body. Then we laugh about that.

She has had a very hard year since becoming a widow at thirty years old last July. She is a mom of three of my Grandy kids and I couldn't be more proud of how she has handled herself during this difficult time...she is FABULOUS!

So you see, when we are laughing together, no matter what it is about, it is extra special...just like her.

I hope you have all visited and LIKED my Pixie HeartStrings FaceBook page! It really is the very best way to keep up with all the new & exciting Pixie Creations. I try to post everyday. Stop by. Check it out. LIKE it. I know you will...

How about you tell me what YOU are working on!!! Leave me a comment here! Send me a pic on FB! I want to see!!!

Stay Crafty!
Susie

Tuesday, April 9, 2013

Pixie HeartStrings News...

Hey Pixie Pals!

How are you all? The weather here in New England has been really nice the past few days. I actually broke out the flip flops today!

Yesterday was opening day at Fenway!
 
It was a perfect day for it. And, the fact we won made it all the better...
 
I had lunch today with a very special friend. She lost her daughter a couple of weeks ago and will now be raising her 4 year old granddaughter. My heart breaks for her. But she has that little Pixie to take care of now and she will keep her busy and bring her great joy. She has a long journey ahead of her and I pray she will find her strength to go on. Her Pixie will help though...
 
I made this little hat for her Pixie. It is the exact same pattern as the Aruba Pixie hat.  I added a little ladybug to bring her luck. She loves ladybugs...
 
I am getting ready to do my very first craft show. My hands are working as fast as they can! Wish me luck! There is so much more yarn to buy for new Pixie Creations!!!
 
Don't forget to visit and LIKE my Pixie HeartStrings FaceBook page. I am working on more patterns and you can stay updated there as to when they will be posted here. I try to share something new everyday. It won't always be a new pattern But, if I can help with inspiration just a little bit, well, that it good too. And I would love to see what you are working on too! Especially if it is a Pixie Creation...:)
 
Stay crafty my friends,
Susie


Thursday, April 4, 2013

Dinosaur Spike Pixie Hat Pattern...

Hey Pixie Pals!

I made this hat for a cute little five year old Pixie. Then I got a couple of requests for one from my Grands. Even my not so little anymore fifteen year old Pixie asked for one today when she saw me working on this pattern.
This hat is made for a larger child. The Pixie I made it for had a pretty big head, as do my Grands. This would fit my fifteen year old Pixie.
Remember, just a Grandma here, not a pro. But, if you have any questions let me know and I would be more than happy to help.


So, here you go...
Dinosaur Spike Pixie Hat

Materials:
 
1 Skein Sugar & Cream cotton for main body of hat.
1 Skein Sugar & Cream cotton in contrasting color for spikes & trim.
I am using Black & Hot Pink! A request from my Grandy Girl. She is 12 and wants this hat very much. She is sooooo fun!
 
Size I crochet hook.
Size E crochet hook.
 
Stitches Used:
 
Chain (CH)
Body of hat is worked in half double crochet (HDC).
Slip Stitch (SS)
Trim & Spikes are worked in single crochet (SC).
 
Body of Hat:
 
Use main color & I hook...
  1. Ch 5 and join with a SS to form circle.
  2. Ch 2 (counts as 1st HDC) Make 9 HDC in circle. Join with SS in top of chain 2. 10 HDC.
  3. CH 2. HDC in same ST. 2 HDC in each HDC around. Do not join. Use a marker to keep track of your rows.  20 HDC.
    Mark your rows...
  4.  
  5. Make *HDC in next ST, 2 HDC in next ST* Repeat around to marker.
  6. Make *HDC in next 2 ST, 2 HDC in next ST* Repeat around to marker.
  7. Make *HDC in next 3 ST, 2 HDC in next ST* Repeat around to marker.
  8. Make *HDC in next 4 ST, 2 HDC in next ST* Repeat around to marker.
  9. Make HDC in each ST around to marker.
  10. Continue row 8 until hat measures 7" from top. Do not finish off.
Ear Flaps:
 
For first flap just continue from where you left off from last row. For the 2nd flap, fold hat in half and begin in HDC directly across from other side.
Start 2nd Flap Here...

  1. CH 2 (counts as first HDC) HDC in next 13 ST. Turn. 14 HDC.
  2. CH 2. HDC 2 tog. HDC in next 9 ST. HDC 2 tog. HDC in last ST. Turn. 12 HDC.
  3. CH 2. HDC 2 tog. HDC in next 7 ST.  HDC 2 tog. HDC in last ST. Turn. 10 HDC.
  4. CH 2. HDC across. Turn. 10 HDC.
  5. CH 2. HDC 2 tog. HDC in next 5 ST. HDC 2 tog. HDC in last ST. Turn. 8 HDC.
  6. CH 2. HDC across. Turn. 8 HDC.
  7. CH 2. HDC 2 tog. HDC in next 3 ST. HDC 2 tog. HDC in last ST. Turn. 6 HDC
  8. CH 2 HDC across. Turn. 6 HDC.
  9. CH 2 HDC 2 tog. Twice. HDC in last ST. Turn. 4 HDC.
  10. CH 2 HDC in next 3 HDC. Finish off.
Trim:
With contrasting color (CC), work SC evenly around body of hat.

SC evenly around hat with CC
Spikes:
Use CC and E hook.
Note: I work mine in a continuous spiral, but you can join with a SS at the end of each round. Whichever you like best...

  1. Ch 2. 6 SC in 2nd CH from hook. Pull tail tight to close circle. 6 SC.
  2. *1 SC in next ST. 2 SC in next. 3 times. 9 SC.
  3. 1 SC in each ST around. 9 SC.
  4. *1 SC in next 2 ST. 2 SC in next.* 3 times. 12 SC.
  5. 1 SC in each ST. 12 SC.
  6. *1SC in next 3 ST. 2 SC in next.* 3 times. 15 SC.
  7. 1 SC in each ST. 15 SC.
  8. *1 SC in next 4 ST. 2 SC in next.* 3 times. 18 SC.
  9. 1 SC in each ST. 18 SC.
  10. SS into next SC. Fasten off and leave a long tail for sewing.
Leave long tail for sewing to hat...
Hat will need 5-7 spikes...check layout to see how many you will need/desire...

Assembly:
Lay your hat out flat so that you can see the ridge where the spikes should be sewn.

Fold hat in half and line up spikes for sewing...
Use yarn to mark where you want all spikes. Then use yarn needle & using the long tails left on spikes sew them in place. I need 6 spikes for my hat. Depending on how tight/loose you crochet you may need more or less.

Ties:
I use both colors. 6 long strands of each. Then I pull all 6 strands through the center of the last 4 HDC made on the ear flaps. Now you have 12 strands...
Pull all six through center of last 4 HDC...
Tie a knot in strands at base of ear flap...
Tie knot at base of ear flap...
Now braid all 12 strands and tie additional knot at end of braid...
Braid all 12 strands...
 Finis! Well...mine will be in the morning. I forgot the not so little Pixie had dance and drama rehearsals today! She is a busy kid! I love it...
Any questions let me know...

And DON'T FORGET TO LIKE my Pixie HeartStrings FB Page so you can keep up with new & exciting projects posted almost daily! AND, feel free to share your finished project there for all to enjoy. Be PROUD! Show it off!!! :)

Happy Creating!
Susie
 

Sunday, March 31, 2013

Wednesday, March 27, 2013

Sadness...


Hello...

This week has been one filled with sadness...

A beautiful young woman who had so much to live for gave up on herself...

She leaves behind a family who loves her that has become forever altered by such a senseless, impulsive act...

She leaves behind the most angelic little Pixie...

She leaves behind a beautiful unfinished life...

Please pray for her and her family...

XOXOXO,
Susie


Friday, March 22, 2013

Aruba Pixie Sundress Pattern...


Hi!
As promised I am back with the pattern I developed for the sundress above. Again, keep in mind, I am not a professional. Just a Grandma who enjoys making Pixie Creations...

Materials:
As it is a Sundress, you really want the yarn you choose to be lightweight and something that will "breath" in order to keep the child comfortable.
I chose to use a mercerized cotton. The one I used comes double stranded. It has a smooth, shiny finish to it and works up nicely. I have also used the Fashion 3 mercerized cotton and doubled it up myself.
I use a cotton blend for my fabric. Again, something cool & crisp.
For the yarn I chose, I used an F Hook. You should choose your hook to go with your yarn choice.

Sizes:
6M (1, 2, 3)YR
Chest Measurements 18(20, 22, 24)"
I work the piece by measurements...that is, I do not have a set chain length to start. I make a chain to my chest measurements that I have decided to make the dress. Therefore, if I am making a 6 Month size top, I want to make my front and back to both be 9" wide when finished. When sewn together they will become my 18" chest measurement. Both sides are worked exactly the same.

Directions:
Make chain to desired length.
  1. SC in 2nd chain from hook and across chain to end. Chain 1 & turn.
  2. SC across each SC to end. Ch 1 & turn.
  3. Repeat row 3 until piece measures 1(1 1/2, 2, 2 1/2)"
  4. Slip Stitch next 3(4, 5, 6) SC. SC to within last 3(4, 5, 6) SC. Ch 1 & turn.
  5. SC across to end. Ch1 & turn.
  6. Work even until piece measures 3(3 1/2, 4, 4 1/2)" from bottom. Ch 1 & turn.
  7. Left Front: SC 9(10, 10, 10). Ch 1 & turn.
  8. Work even until piece measures 4(5, 6, 7)". Fasten off.
  9. Right Side: Skip Center until you have 9(10, 10, 10) left on row. SC those to end. Ch 1 & turn.
  10. Work even until piece measures same as left front. (same amount of rows). Fasten off.
  11. Make back piece exactly the same.
  12. Sew shoulder & side seams.
  13. Work SC evenly around neckline and both armholes. Join with a SS and fasten off. Pic A
  14. Turn piece upside down and work SC evenly around the bottom. Join with a SS.
  15. Work SC in same stitch as SS *skip 2, 5DC, skip 2, SC* around. Join with a SS and fasten off. Weave in all ends for a neat finish. Pic B
  16. Make and attach flower same as in hat pattern in last post. Or you can embellish any way you choose. Plain & simple is pretty too...
Pic A
Pic B
Skirt:
From fabric cut a piece 1 1/2 X's wider than the width of bottom of your crocheted top. Piece should be cut to your desired length plus 1 3/4" to allow for hem.
  1. Stitch the back seam. I prefer to have no raw edges so I use a French Seam. You can use a regular seam with 5/8" seam allowance. Pic C.
  2. Gather top of fabric. Adjust to fit width of crocheted top.
  3. Hand stitch the crocheted top to your fabric. Pic D.
  4. Press under 1/4" at hemline.
  5. Turn hem up 1 1/2" and sew in place. You could also machine stitch. I prefer to hand sew.
Pic C
Pic D


Ta Da! You are done!!! If you have any questions let me know. I will be happy to help. And please...feel free to post your finished projects on the Pixie HeartStrings FaceBook page. I would love to see them! And please take a moment to Like the page. That way you will know when new items in my Etsy Shop or free patterns are featured!

Have a fabulous weekend!!!
Susie

Tuesday, March 19, 2013

Pixie Creation Pattern!


Hi there!
 
I made this Hat for a friend who is going to Aruba to visit her God Daughter. She is a very generous person who does a lot for assorted charities and I wanted to do something nice for her...
 
I posted this on my Pixie HeartStrings FaceBook page and was asked for the pattern. So, here it is. Keep in mind, I am not a professional, I am a Grandma making hats for little Pixies and I just do what I know how. You can improve on yours anyway you would like...
 
This particular hat is made from some vintage Bernat Cassino mercerized cotton I have been hoarding. I have also made this hat in many other yarns. And depending on weight of yarn, you should pick a hook size you that will work with the yarn best. I used an F hook for this particular yarn. When I use a heavier yarn, I use an H hook.
 
The key is the head measurements. So, as this one is for a 9 month old, I wanted to make the hat fit a baby 6-12 months. So I wanted the hat to be about 17.5 inches circumference and about 6.5 inches from the crown to the bottom of the ear. I do not include the brim in this measurement. Your baby may have a bigger head, you can just add more increase rows to accommodate.
 
There is a great chart I found on Pinterest  that is invaluable in helping decide how big to make your hat. So, size decided, here goes...
 
Aruba Pixie Hat
  1. Chain 3 and join with a slip stitch (SS) to form a circle.
  2. Make 9 single crochet (SC) in circle. Join with a SS to the 1st SC. 9 SC
  3. Make 2 SC in each SC of last row. Join with a SS to 1st SC. 18 SC
  4. SC in each SC of last row. Join with a SS to 1st SC. 18 SC
  5. Make 2 SC in each SC of last row. Join with a SS to 1st SC. 36 SC
  6. SC in each SC of last row. Join with a SS to 1st SC. 36 SC
  7. Repeat row 6. 36 SC
  8. *2 SC in first SC of last row. 1 SC in next*. Continue in this pattern to last SC. Join with a SS to 1st SC. 54 SC
  9. SC in each SC from last row. Join with a SS.
  10. At this point, you need to decide if you need your hat bigger. You can continue to increase as above. For the 6-12 months I stopped increasing here.
  11. Continue Row 9 until hat measures the length you need for your size according to chart.
  12. You will now make brim.
  13. Repeat Row 8. 
  14. SC in each SC of last row. Join with SS in 1st SC. 
  15. Repeat row 14 until brim measures 2 inches.
  16. SS in each SC from previous row. Fasten off.
Please note...Brim can be worn up or down on this hat.
 
You can embellish the hat any way you wish. I chose a simple flower in the main color (MC) of hat and a complimentary color (CC.
 
Crochet Flower
  1. With CC, Chain 3 & SS in first chain to make circle.
  2. 12 Double Crochet (DC) in circle. Join with a SS. Do not break Yarn.
  3. Connect MC  with a SS in same DC as last SS. SC in same stitch. *Chain 3. Skip next DC. SC in next DC.* Continue pattern around. Join with SS in 1st SC. 6 Chain 3 loops.
  4. SS into 1st chain 3 loop. Make *SC, 5 DC, SC in loop to form petal. SS into next chain 3 loop*. Continue in this pattern until you have 6 petals. Fasten off CC.
  5. Pick up your main color (MC). Working behind the petals just made, SS into 1st unused DC from 1st Row. SC in same stitch. * Chain 5. SC in next unused DC* Continue around until you have 6 chain 5 loops. Join with SS to 1st SC.
  6. SS into 1st chain 5 loop. Make *SC, 7 DC, SC in loop to form petal. SS into next chain 5 loop.* Continue in this pattern until you have 6 petals made out of MC. Fasten off.  
  7. Attach flower to either side of hat as desired.
  8.  
 
I made this cute sundress to go with the hat or vice verse. Heehee...
I will be posting the pattern I made up for the top and directions for the skirt in my next post...
 
So, Please stop by again so you can get that pattern and be sure to let me know you were here or if you have any questions at all. Again, I am just a Grandma who loves to crochet for her Pixies, but I will do my best to address any issues that come up...
 
Feel free to post your pictures of your finished Pixie Creation on my Pixie HeartStrings Facebook page. I would love to see them or whatever else you may be working on. And make sure you LIKE it so you can get in on the GIVEAWAY I am having when the page reaches 100 likes!
 
Now go create!!!
 
Susie